
Over the last few days, I have been playing with some different types of image transfer to see the different effects. The first was the straightforward Polaroid lift. Thanks to fellow student Kate for the spare polaroid and instructions. I don’t have a Polaroid camera, so this was new territory for me. The process is quite straightforward. One cuts the edges off the Polaroid image and then dunks it in hot water. After a minute or so, it is easy to peel off the backing paper, leaving just the protective front and the image itself. If this is put back into the hot water, eventually one can tease off the protective film, leaving a think skin which contains the print. I applied it to a new piece of acrylic, and the image (which of itself is nothing important) is shown below, front and back, via a scan.
-

- Front
-

- Back
Interestingly, the image is much larger than the original Polaroid and it seems somehow to have stretched or expanded during the process. I am not sure that the front particularly appeals to me, but the back has potential. I’m wondering what it would look like with some colour or dye on it, to bring out the differing depths of the coating. Also, I’m not entirely sure whether the white film is an integral part of the final piece, or whether I could have washed it off if I had been more careful.
Next up was a wet inkjet transfer. I followed the instructions in part 5.2 of Alternative Photographic Processes ( 2015) with some trepidation, as I was concerned that I might ruin my beloved printer by putting waxed paper through it. The idea is that one prints the image onto the waxed paper (from a sheet of Avery labels), which is then pressed onto a piece of matt photo paper. The image transfers immediately, but has a slightly different quality because the ink spots retain some of their individuality. Happily, the printer survived and the result was this shown below. For comparison, I’ve also included a straightforward print too, and as you can see, the transfer is reversed. It would also be possible to have the identical image by flipping it before printing in Lightroom.
-

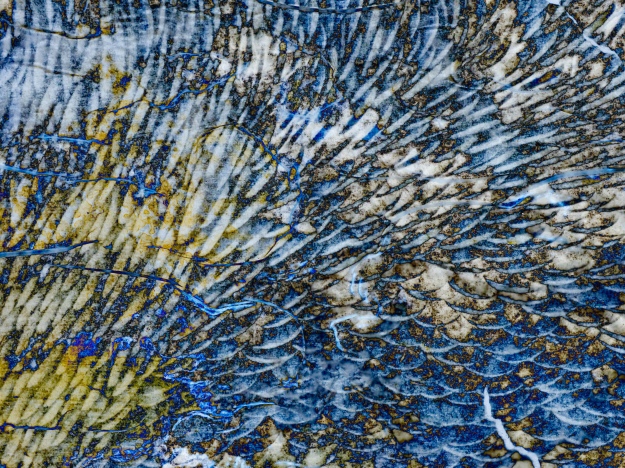
- Original. A detail from Fenella Elms ‘Flowpot’ (2016) at Swindon Museum & Art Gallery
-

- Wet inkjet transfer from the previous image
Again, I am not sure how I would use this technique, but I know how to do it now, and it is there as a possibility for future work.
Then I tried an acrylic gel lift (pt 5.1 in Alternative Photographic Processes). This is getting a bit further away from my comfort zone, and thank you, Kate, for the loan of some acrylic gel. The idea is to print the image (I used the same one as for the wet transfer) onto plain typing paper. One then coats it with 6-12 thin layers of acrylic gel, letting it dry in between. The the paper is floated in warm water to wet it, and one gently rubs the paper off the gel to leave the underside of the ink layer on show. After the remaining gel layer is allowed to partially dry, it can then be applied to whatever surface is desired, (wood, paper, glass, mirror, stone or anything else that appeals). For the purposes of this experiment, I used vellum paper, which is very flat, semi-transparent and has a slight sheen.
First thoughts were that I really like this process. It is like magic and the removal of the paper in warm water is remarkably simple. (When you collect up the bits afterwards, you realise just how little pulp goes into a single sheet of printer paper). I was in too much of a hurry, and in retrospect I would have added a few more coats of gel to make the print as little easier to handle, as I did tear it during the process, and I would also dry it out before applying it to the vellum, as even after a couple of hours in the book press, the finished page was somewhat wrinkled. However, we live and learn.
Here are some of the results. I’m not quite sure why there is a brown stain on it – whether it came from inside the print itself or from the contact with the metal book press, but I don’t dislike it. The white patches are where some paper fibres still remain, and again I quite like the randomness of them.
-

- Front, whole image
-

- Back, whole image
-

- Front, detail
-

- Back, detail
I then put it on a light table to see what effect that would give. Here are some of the results below.
-

- On light table, whole image, front
-

- Detail, back, on light table
-

- Detail, front on light table
These are the most successful, and there is definitely potential with this process for adding layers of texture to images. I will be coming back to this process again in the future.
Just as a final note, I also love the deep, vibrant colours which are produced if the image is Inverted and put through the Difference filter in Photoshop. This would make a great background for something.
Finally, I haven’t been able to do this as I don’t (yet) have any DASS ART transfer film, but it looks fabulous and has a real one-off look to it. Something to have a go at soon. (I’ve ordered some transfer paper, so it should be very soon).
References
Wilks, Brady (2015) Alternative Photographic Processes: Creating Handmade Images. New York: Focal Press.
